Batch processing guide (HPC)
Computing servers
Now that you are set up, you will be able to start using our available computing services. To do so, you need to read the Research Group Specifications of the group you belong to and follow the steps to connect to their development environment (frontend server). Once connected to your Research Group environment, you will enter a server named <research_group>Exx.
The remaining question is: Where to really run our experiments?
If everybody runs their processing-intensive experiments in their development environment, that would probably use a lot of RAM memory, and these servers (<research_group>Exx) would probably collapse, or run too slowly for normal coding.
For this reason we have a computing service, to be able to run a lot of experiments using all our computing servers, but keeping our access servers free to be used to code or other non-processing-intensive tasks.
The process is the following: When you send a job to your server, it is sent to a Queue Manager that looks for a free node in your partition with the capacity to run your project, and when it finds one available, it executes your job on said node, named <research_group>Cxx. Note that in this page we give a brief introduction of the Queue Manager monitoring system, but if you want more information on the matter please visit the official slurm documentation.
You can find a list of the available nodes in every partition from every research group in the inventory.
If you want to check the job resource usage, please review this document.
Monitoring the computing service
To see the resources information of the computing service and partitions, you can use sinfo:
myuser@mygroupe01:~$ sinfo
To see the current status of the computing service just type squeue or sview:
myuser@mygroupe01:~$ squeue
             JOBID PARTITION     NAME     USER ST       TIME  NODES NODELIST(REASON)
            240123  standard   python asalvado  R 2-01:59:39      1 mygroupc5
            264825  standard matrix_c etacchin  R    2:01:29      1 mygroupc5
In this example you can see that the user asalvado is running (R) a python experiment for more than 2 days, and etacchin some matrice-related one for more than 2 hours, both in mygroupc5 node.
If you run sinfo-usage <partition_name> you can see in detail the available and allocated resources on any compute node. Example:
myuser@mygroupe01:~$ sinfo-usage gpi.compute
         NODE NODE Limit Allocated Available
         NAME STATUS CPU GPU RAM CPU GPU RAM CPU GPU RAM
         gpic09 mix 32 8 251G 9 2 75G 23 6 176G
         gpic10 idle 32 8 251G 0 0 0G 32 8 251G
         gpic11 idle 40 8 376G 0 0 0G 40 8 376G
         gpic12 mix 40 8 376G 1 1 16G 39 7 360G
         gpic13 mix 40 8 251G 8 4 32G 32 4 219G
         gpic14 idle 40 6 251G 0 0 0G 40 6 251G
Let's submit some jobs!
Submitting a job
Do you know the sleep command? Well, it just does nothing for the seconds that you specify as a parameter... quite simple, right?
As any other command, if you simply type it in the shell, it will run the host you are logged in. If, for example, we were on gpie01 (GPI research group, on development server 01):
myuser@gpie01:~$ sleep 10 &
[1] 30329
myuser@gpie01:~$ squeue
             JOBID PARTITION     NAME     USER ST       TIME  NODES NODELIST(REASON)
            240123  standard   python asalvado  R 2-01:59:49      1 gpic5
            264825  standard matrix_c etacchin  R    2:01:39      1 gpic5
Please note that the final & of the sleep 10 & command is just to recover the terminal after the call, to not wait until it finish (more info about running shell commands).
Then, after calling sleep 10, we can see that nothing changed in the computing service...(because the sleep command is running in the development server). But if we simply type srun before it, then it will run in the computing service:
myuser@gpie01:~$ srun sleep 10&
[1] 31262
myuser@gpie01:~$ squeue
             JOBID PARTITION     NAME     USER ST       TIME  NODES NODELIST(REASON)
            240123  standard   python asalvado  R 2-02:00:22      1 gpic5
            264825  standard matrix_c etacchin  R    2:02:12      1 gpic5
            264836  standard    sleep   myuser  R       0:03      1 gpic5
In the last line of the squeue command you can see that our sleep is now running, not in gpie01, but in the gpic5 node.
Submitting a job to a partition queue
The computing service is divided into several partition queues, like in a supermarket. If, for example, you belonged to the GPI Research Group, your possible partitions would be gpi.compute (for more information on research groups and partitions, please review the Research Groups Specifications page). In the GPI example, the gpi.compute partition allows to run your command with a big time limit (24h), but you will probably wait in the cue until there are resources available for you. To use it:
myuser@gpie01:~$ srun -p gpi.compute sleep 10&
In any case, if you need to compute something, please submit it into the system and wait until it is computed, do not cancel your own jobs because they are waiting. Cancelling jobs that you actually want to compute is bad for several reasons:
- Of course, it won't be computed until you submit it again...
- The more time that your job is in the queue the more priority it gains to be the next to be run.
- The length of the queue allows us to determine the actual computing needs of the group, that is, your actual computing needs.
- If you "wait" to submit (without any jobs in the queue) instead of waiting in the queue, for the system you are not actually waiting.
Priorities of a job
Our queue manages jobs differently depending on its occupation: if it isn't full, the queue works as a FIFO (first in first out), which means that the servers assigns its resources based solely on the order its clients asked for them.
When the queue is full, however, we switch to using a multifactor priority that manages the positions in the queue based on three factors: Your share (explained below), your occupation of the server in the last 24 hours, and the time you have been waiting on the queue, mainly weighting on the share (fairshare factor).
The summarized process is the following:
We have three types of users, and each type has a different share (a percentage of 'ownership' of the cluster).
The categories, in order of share, are:
1. Members: PhDs and professors <Highest share>
2. Collaborators
3. Students <Lowest share>
The fairshare algorithm adjusts the priority of jobs for all users to ensure that they have their appropriate share.
Possible situations you might be encountering: If you have a high share but are running many jobs, your priority is lowered to allow others to go ahead of you. On the other hand, if you have a low share but are using the system minimally, your priority is increased so that you can utilize it more. Also, the more time you have been waiting on the queue, the higher your priority gets.
The queue manager we use is Slurm, which is an open-source workload manager and job scheduler designed for high-performance computing (HPC) clusters and supercomputers. You can visit the multifactor priority plugin and classic fairshare algorithm pages on their official website for more in depth info on this topic.
Cancelling a job
To cancel your running job you have to get its jobid by running squeue, and the just:
>> scancel $JOBID
Asking for computing resources
CPUs
To ask for 2 CPUs:
>> srun -c 2 ./myapp
RAM
To ask for 4G of RAM:
>> srun --mem 4G ./myapp
Please note that, if you get the message srun: error: task: Killed, it is probably because your app is using more RAM that your reserved. Just ask for more RAM, or try to reduce the amount of RAM that you need.
GPUs and their RAM
GPUs are part of the Generic Resources (gres), so to ask for 1 GPU:
>> srun --gres=gpu:1 ./myapp
If you want an GPU with at least 6GB of RAM:
>> srun --gres=gpu:1,gpumem:6G ./myapp
Usually you need to check how much GPU RAM is your job actually using. The nvidia-smi is the right command to use, but to integrate it into our comuting service, you should use:
>> srun-monitor-gpu $JOBID
Please note that you always should specify the -A parameter when using the srun command to avoid any error messages, and it needs to be the one your partition belongs to. All our accounts have the same names as our research groups, so for example if you are on research group CSL, you should use the paramenter -A csl, and then specify one of our two possible partitions in csl (csl and csl.develop) with the parameter -p.
Remember that you can always type the srun -h command to know more information about its options.
Where $JOBID is the jobid of your running job. You can see it in the first lines when your job starts, or in the output of the squeue command.
Graphical Interfaces
If you job does any kind of graphical visualization (opens any window), then you need to pass an extra parameter --x11:
>> srun --x11 ./myapp
Submit jobs with a batch file
You also can create an automated script, in this case you ask for a GPU. Look at this example myscript.sh
#!/bin/bash
#SBATCH -p veu             # Partition to submit to
#SBATCH --mem=1G      # Max CPU Memory
#SBATCH --gres=gpu:1
python myprogram.py
>> sbatch myscript.sh
Interactive Jobs
If, for example, you belong to the GPI research group and are currently working on the developing environment gpie01, gpie01 is CPU and memory limited per user, some daily operations can be slowed or even "killed". When this occurs, you should work with an interactive shell executed into a job. All the operations will be executed on a compute server but at the same time, will be applied to your current directory. This is an example:
>> srun --pty --mem 16000 -c2 --time 2:00:00 /bin/bash
Then you can execute interactively what you want having 2 cores and 16GB of RAM on a remote compute server during 2hours.
Please note that this explanation applies to all developing environments form every research group, gpie01 is only an example case.
Job arrays
If we plan to run the same experiment hundreds or thousands of times but just changing some parameters, the Job Array is our friend.
The best way to understand them is following an example.
Imagine tha we want to run this three commands:
>> srun  myapp --param 10
>> srun  myapp --param 15
>> srun  myapp --param 20
In this simple use case we could just do it like that: three srun commands.
But if we want to test myapp with hundreds or thousands of parameters, do it manually is not an option; and job arrays are here for the rescue!
To achieve this three commands using Job Arrays we always need to create a shell script that we can call worker.sh. A first approach to solve the problem could be a worker.sh like this:
#!/bin/bash
myapp --param $SLURM_ARRAY_TASK_ID
And we should launch it with:
>> sbatch --array=10,15,20 worker.sh
Here we should note several things:
- The sbatch command is almost like srun, but for shell scripts
- The worker.sh script is srunned all the times requested in the --array param of the sbatch command.
- The values and ranges passed to the --array are converted to the $SLURM_ARRAY_TASK_ID variable in each execution
- By default the standard output and error are saved in files like slurm-jobid-taskid.out in the current directory
For example, let's try our first hello job array with a simple worker that just prints out a hello world message, and waits a little bit for convenience:
imatge@nx2:~>> cat worker.sh
#!/bin/bash
echo "Hello job array with parameter: " $SLURM_ARRAY_TASK_ID
sleep 10 # to be able to run squeue
We can launch 5 jobs in an array with:
>> sbatch --array=0-5 worker.sh
Submitted batch job 43702
If we monitor the queue we see our 5 executions:
>> squeue
               JOBID PARTITION      NAME     USER ST       TIME CPUS MIN_MEM GRES            NODELIST(REASON)
             43702_0  standard worker.sh   imatge  R       0:02    1    256M (null)          v5
             43702_1  standard worker.sh   imatge  R       0:02    1    256M (null)          c4
             43702_2  standard worker.sh   imatge  R       0:02    1    256M (null)          c4
             43702_3  standard worker.sh   imatge  R       0:02    1    256M (null)          c4
             43702_4  standard worker.sh   imatge  R       0:02    1    256M (null)          c4
             43702_5  standard worker.sh   imatge  R       0:02    1    256M (null)          c4
Once they are done, we can see the output files in the current directory following the slurm-jobid-taskid names:
>> ll slurm-43702_*
-rw-r--r-- 1 imatge imatge 35 Nov  4 19:21 slurm-43702_0.out
-rw-r--r-- 1 imatge imatge 35 Nov  4 19:20 slurm-43702_1.out
-rw-r--r-- 1 imatge imatge 35 Nov  4 19:20 slurm-43702_2.out
-rw-r--r-- 1 imatge imatge 35 Nov  4 19:20 slurm-43702_3.out
-rw-r--r-- 1 imatge imatge 35 Nov  4 19:20 slurm-43702_4.out
-rw-r--r-- 1 imatge imatge 35 Nov  4 19:20 slurm-43702_5.out
And we can check the expected output contents:
>> cat slurm-43702_*
Hello job array with parameter:  0
Hello job array with parameter:  1
Hello job array with parameter:  2
Hello job array with parameter:  3
Hello job array with parameter:  4
Hello job array with parameter:  5
Note that you can combine ranges and values in the --array parameter of the sbatch command like this:
>> sbatch --array=1-3,5-7,100 worker.sh
Submitted batch job 43710

>> cat slurm-43710_*
Hello job array with parameter:  100
Hello job array with parameter:  1
Hello job array with parameter:  2
Hello job array with parameter:  3
Hello job array with parameter:  5
Hello job array with parameter:  6
Hello job array with parameter:  7
This range and values flexibility could very useful when for example we run thousands of workers, but just some of the failed and you want to rerun only those.
Note also that we can also use a Python script (or any other script language) as a worker, like this:
>> cat worker.py
#!/usr/bin/python
import os
print "Hello job array with Python, parameter: ", os.environ['SLURM_ARRAY_TASK_ID']

>> sbatch --array=1-3 worker.py
Submitted batch job 43720

>> cat slurm-43720_*
Hello job array with Python, parameter:  1
Hello job array with Python, parameter:  2
Hello job array with Python, parameter:  3
We can use arrays or dictionaries in our script to handle multple parameters of our worker script:
>> cat worker.sh
#!/bin/bash

param1[0]="Bob"; param2[0]="Monday"
param1[1]="Sam"; param2[1]="Monday"
param1[2]="Bob"; param2[2]="Tuesday"
param1[3]="Sam"; param2[3]="Tuesday"

echo "My friend" ${param1[$SLURM_ARRAY_TASK_ID]} "will come on" ${param2[$SLURM_ARRAY_TASK_ID]}

>> sbatch --array=0-3 worker.sh
Submitted batch job 43734

>> cat slurm-43734_*
My friend Bob will come on Monday
My friend Sam will come on Monday
My friend Bob will come on Tuesday
My friend Sam will come on Tuesday
To handle parameters we can alse use external files and use the SLURM_ARRAY_TASK_ID as the line nuber to read the desired parameters, like this:
>> cat param1.txt
Bob
Sam
Bob
Sam
>> cat param2.txt
Monday
Monday
Tuesday
Tuesday

>> cat worker.sh
#!/bin/bash
param1=`sed "${SLURM_ARRAY_TASK_ID}q;d" param1.txt`
param2=`sed "${SLURM_ARRAY_TASK_ID}q;d" param2.txt`
echo "My friend" $param1 "will come on" $param2

>> sbatch --array=1-4 worker.sh
Submitted batch job 43740

>> cat slurm-43740_*
My friend Bob will come on Monday
My friend Sam will come on Monday
My friend Bob will come on Tuesday
My friend Sam will come on Tuesday
Please note that in this case we have to use the range 1-4 instead of the range 0-3 that we used when we save the parameters in arrays instead of files.
Computing with graphical user interface support
This service is based on open source software called open ondemand. The access web page is https://ondemand.tsc.upc.edu/ and you can log in with your UPC username and password.
The following image shows the environment shortcuts:

Once you click on your Desktop App, you'll find a form like this:

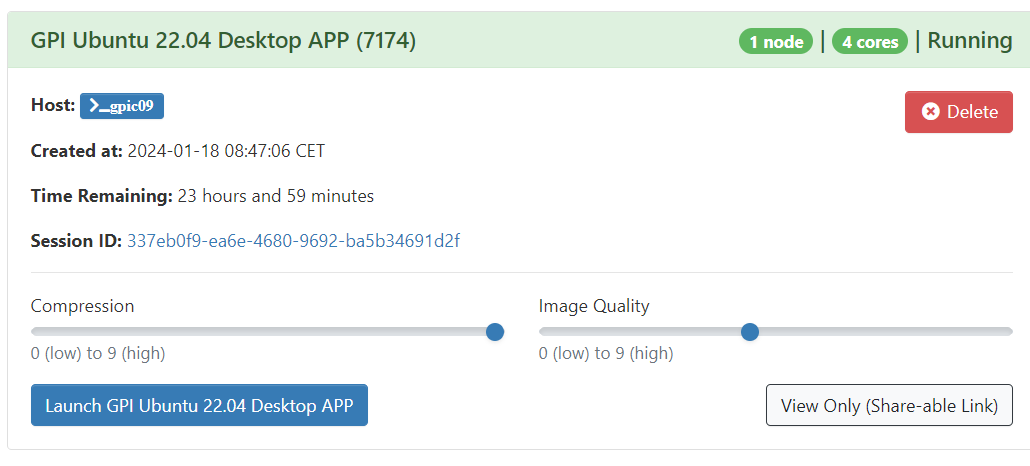

When you are done using your desktop you can end it by clicking "Delete".
Closing you're web browser does not ends the running session, so you can resume your remote connection any time before the job stills running.
Share: